Home » Without Label » Cutting Crown Molding For Cabinets : Crown Molding Ideas - 10 Ways to Reinvent Any Room - Bob Vila - Pick one side of your cabinet to start with.
Cutting Crown Molding For Cabinets : Crown Molding Ideas - 10 Ways to Reinvent Any Room - Bob Vila - Pick one side of your cabinet to start with.
Cutting Crown Molding For Cabinets : Crown Molding Ideas - 10 Ways to Reinvent Any Room - Bob Vila - Pick one side of your cabinet to start with.. Use a pencil to mark the exact spot that needs to be cut. Once you have your crown molding measurements, you are going to need to make your cuts. One way to cut crown molding it to use the 90 degree intersection of the table and fence on a miter saw to play the part of wall and ceiling. While it has to be purchased, it also has to be cut correctly to fit your space as well as join seamlessly in the corners of your room. For strength and stability, gussets are added to the top.
Two ways to cut crown molding: Start with a side piece. Cutting crown molding for cabinets. Measure a piece of crown molding equal to the length of the cabinet. It's a good idea to cut the corner angles first, then measure the rest to fit.
what angle to cut crown molding corner cabinet | www ... from i0.wp.com How to cut crown molding: Provide a nailing surface for crown moulding by attaching solid wood mounting strips to the top edges of the cabinets. Mark where the crown molding will sit on the cabinet. Hold the straight end against the wall and mark where the crown moulding exits the cabinet. Well there are different spring angles crown can be so it depends on that to use a compound bevel cut. Cut crown molding for side of cabinet measure the length of the side pieces. Start with a side piece. Crown molding that sits atop kitchen cabinets gives them a solid, finished look.
Repeat this process with another piece of crown molding.
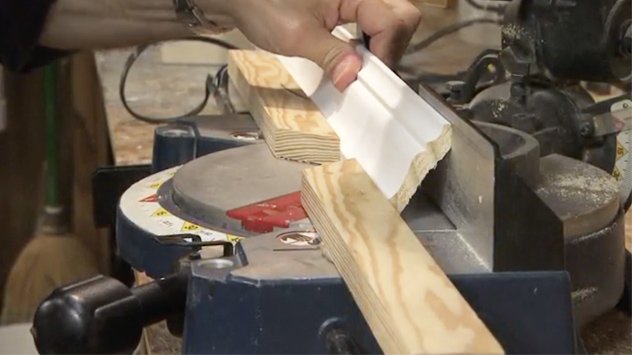
How to cut crown molding: Therefore, when adjusting the saw for out of square corners, the user needs to only adjust the miter system, as opposed to both miter and bevel systems when laying crown materials flat. One way to cut crown molding it to use the 90 degree intersection of the table and fence on a miter saw to play the part of wall and ceiling. this is part of my how to install crown molding series. there are four ways to terminate a crown molding in a room where you can't simply finish the crown at its starting point. I cut and fit the cleat to the tops of the cabinets and install the crown to the face of the cleat (on the ¾ edge). Learn how to angle cut the gussets and where to locate them on the top of the cabinet. After being cut, the molding is assembled together on the ground with the joints flush. Using a starter or riser molding in conjunction with a crown molding also provides the ability to better disguise an uneven ceiling, as one end of the crown molding may be mounted. Well there are different spring angles crown can be so it depends on that to use a compound bevel cut. Mark where the crown molding will sit on the cabinet. A power miter saw is the best way to cut crown moulding once you measure the angles. Sometimes you need to flip the crown upside down to cut. 1 tools needed to cut crown molding for cabinets.
Cutting crown molding unfortunately, installing crown molding isn't as simple as a trip to the store. You don't want this molding to pull off the cabinet if someone pulls or pushes on it when moving the cabinet, for example. Pick one side of your cabinet to start with. Sometimes you need to flip the crown upside down to cut. Provide a nailing surface for crown moulding by attaching solid wood mounting strips to the top edges of the cabinets.
Trick for Cutting Crown Molding on Angle | Today's Homeowner from todayshomeowner.com I load up the cabinets and the cleat/crown assembly separately. •1 set the miter angle at 45 degrees to the left. One way to cut crown molding it to use the 90 degree intersection of the table and fence on a miter saw to play the part of wall and ceiling. Cutting crown molding unfortunately, installing crown molding isn't as simple as a trip to the store. Cutting crown molding for cabinets. And it isn't really 'hard math' since my 5 year old could do it.divide that angle in half (since you want to your crown to meet right in the center of your angle): •2 place the molding top up, face out and tight against the fence of the saw •3 make your cut with the waste side to the left of the saw blade. Measure a piece of crown molding equal to the length of the cabinet.
Measure out and cut a length of crown molding that is at least a few inches longer than the side of your cabinet.
Cutting crown molding for topping kitchen cabinets tends to be easier than cutting it for walls, because, unlike most walls, the square angles on cabinets actually are square. The saw can be set to 45 degrees to the left or 45 degrees to the right. Two ways to cut crown molding: Use a pencil to mark the exact spot that needs to be cut. Set your miter saw to 45 degrees. •1 set the miter angle at 45 degrees to the left. I load up the cabinets and the cleat/crown assembly separately. Crown molding that sits atop kitchen cabinets gives them a solid, finished look. How to cut crown molding: A power miter saw is the best way to cut crown moulding once you measure the angles. While a miter saw will make the job easier, you can effectively cut molding with a circular saw. While it has to be purchased, it also has to be cut correctly to fit your space as well as join seamlessly in the corners of your room. Measure and mark the front section of crown molding to the cabinet width.
Well there are different spring angles crown can be so it depends on that to use a compound bevel cut. 1 tools needed to cut crown molding for cabinets. Measure and mark the front section of crown molding to the cabinet width. Build a frame if necessary. One way to cut crown molding it to use the 90 degree intersection of the table and fence on a miter saw to play the part of wall and ceiling.
Pin by Glenn Rzeszutko on saugatuck | Kitchen cabinet ... from i.pinimg.com Start with a side piece. (use one long strip for a row of cabinets the same depth.) then apply wood glue to each strip, nail it in place, and let dry. Once you have your crown molding measurements, you are going to need to make your cuts. Cutting crown molding for topping kitchen cabinets tends to be easier than cutting it for walls, because, unlike most walls, the square angles on cabinets actually are square. Cut at one mark, then move the molding along to the next mark. It's a good idea to cut the corner angles first, then measure the rest to fit. this is part of my how to install crown molding series. there are four ways to terminate a crown molding in a room where you can't simply finish the crown at its starting point. So the crown molding sits upside down on the saw.
Repeat this process with another piece of crown molding.
Provide a nailing surface for crown moulding by attaching solid wood mounting strips to the top edges of the cabinets. Safety goggles & measuring tape; When doing this, the fence plays the part of the wall and the table plays the part of the ceiling. Finally, the crown is lifted up and installed level and square to the backing pieces. A starter or riser molding is mounted to the cabinet top in order to simulate an extension of the cabinet box, allowing the crown molding to be installed higher. Cutting crown molding unfortunately, installing crown molding isn't as simple as a trip to the store. Here is the only math. Crown molding that sits atop kitchen cabinets gives them a solid, finished look. Once you have your crown molding measurements, you are going to need to make your cuts. Repeat for each cabinet side. My angles were 45 degrees. Hold the straight end against the wall and mark where the crown moulding exits the cabinet. Cut at one mark, then move the molding along to the next mark.